Split DPCM Guide
This page will introduce two different methods to achieve this.
For this, you will need RJDMC (RushJet1's DMC tool). As of 5/9/25 the latest version is v1.55, which is available on GitHub here: link to RJDMC download. RushJet's thread about this program can be found here.
STEP 1
Use RJDMC.exe to handle turning the .wav into DPCM.

(the RJDMC interface)
Importing and Exporting
You can import a .wav either with the yellow folder icon on the left, or from the File menu. I'm pretty sure it has to be 16-bit or less, so if it gives you an error, try re-encoding the .wav as such, for example using Audacity.
If you were working with just a short sample, from here you could just save the .dmc (DPCM sample format) by clicking the 2nd floppy disk icon (the sideways one on the right), or from the File menu as well. In that case, if it's too long, the end of the sample will just be cut off. You can't save long samples this way.
For longer samples, you have to go to File -> "Save split .dmc". This pops up a new window for you to specify where to save to. Tell it where to save and what to name your file with the "..." button. The default "Individual Size" of 4000 bytes should be fine (reducing it makes each split sample smaller). The max is actually 4081 but it doesn't really matter. Yes, the file you're saving is a .txt. It's weird.
The maximum number of DPCM samples is 64, so if you are poised to exceed that amount, the tool will warn you. In practice this means you can fit a little over one minute of DPCM audio into an .nsf.
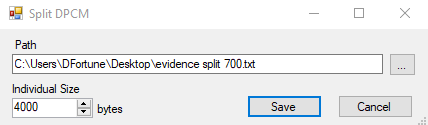
(the "Save split .dmc" dialog)
Editing the Audio
In addition to being able to "Preview" your sample (using the play buttons at the top right), you can do some simple audio editing within RJDMC, like creating fades, adjusting volume, or deleting segments of audio (useful for deleting tails). Even when dealing with regular-sized DPCM samples I generally use this instead of FamiTracker's sample import because it has a few more options. Right click in the waveform area to see these options. In my experience, Revert/Undo actually undoes all changes, not just one.
There are other advanced settings on the right to adjust pitch, sample quality, bitcrushing, and "tilt" which is like creating more (or maybe less) DC offset, impacting the so-called "delta offset" described later in Step 5. The default settings will generally give you the highest quality, but they can be fun to mess around with. You probably won't need them.
It's worth mentioning that volume is kind of finicky with DPCM. Because it's so compressed and hissy sounding, increasing the volume also introduces some extra distortion, changing the tone of the samples somewhat. However DPCM is also noisier at low volumes. Empty space creates a natural high hissing sound, and quiet samples (or quiet parts of samples) naturally contain more noise - or maybe even become just noise if they are quiet enough. This is why something like a ride cymbal sounds particularly weak in DPCM, since it's all attack and a bunch of very quiet, high frequency decay.
In my experience, it's best to process your .wav samples beforehand if your goal is to maximize volume or you really want your samples heard clearly. Compressing and normalizing audio to minimize dynamic range is likely to be worth it because the DPCM channel is altogether not very loud. Raising the gain level on the DPCM within RJDMC (or FamiTracker import) is an option too, but test this to see if you are still comfortable with how it sounds - a limiter-like distortion starts getting introduced the louder you go. Some testing may be necessary to get your ideal sound.
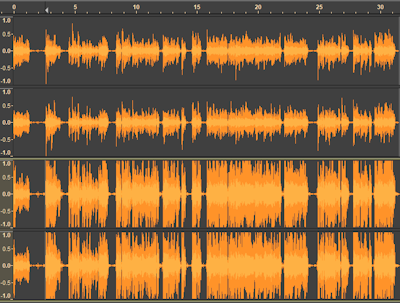
(get compressed, nerd! the bottom example was heavily compressed and was able to present more prominently in the mix)
STEP 2
Deal with your new "split DPCM" .txt file.
Get those samples!
This step is annoying and unintuitive. I apologize in advance.
Open a brand new FamiTracker module. Not your song, a blank module. Go to File -> "Import Text…". THIS WILL OVERWRITE THE ENTIRE CURRENTLY OPEN MODULE which is why it's important to not do this with your song. Avert tragedy.
Once imported, you will now have a module that contains 1 instrument. That instrument will have every .dmc sample file from your RJDMC conversion loaded up. They are in order from 0 to whatever - as in, 0.dmc is the beginning of your big sample, then 1.dmc, etc etc.
I bet you think it's as simple as just saving that new instrument and loading it up in your module, right? Well, it should be, but there's a bug or something. Don't even bother saving the instrument, because opening it up will give you an error: "DPCM sample index out of range..."
So what you have to do is save each .dmc one-by-one from out of the instrument. Click "0.dmc" and press Save to the right, then "1.dmc", and so on until you've saved every sample. It's tedious but I know of no other way to do this.
STEP 3
Import all the .dmc files into your module.
Load em up!
This step is easy enough. Load up an instrument in your module, go to the "DPCM samples" tab, click "Load" on the right, and select all your fresh new .dmc samples. This brings them into your module.
Assign them to whatever string of notes you want using the ← left arrow button. It'll automatically do a run of 12 samples if you just keep pressing ← after the first one, but for whatever reason after 12 you have to select a note (Key) and do that again.
STEP 4
Put everything in its right place.
Time to get precise
Now it's time to place all the samples into the tracker! Fun fun! There is an extent to which this is trial-and-error, but since every sample is the same length, once you've spaced a couple of the samples out correctly, the rest can be approximated pretty quickly.
Start out with getting 0.dmc in the right place by adding the appropriate note into your pattern, then add 1.dmc somewhere in the vicinity of where it should be. Listen carefully for blank space between the samples (this means you need to move 1.dmc earlier) or for if the second sample triggers too soon (so you need to move 1.dmc later). Soloing only the DPCM channel helps pinpoint this.
You will almost surely need to use the Gxx command, which delays notes by X ticks. Although fairly precise, it may not be 100% perfect but unfortunately there is no G½ so use your best judgment!
Once you know how much space is between the first two, it's pretty safe to assume that you can apply the same amount of space between all the other split samples. Because of it being somewhat imprecise, you may have to offset by one tick every now and then to keep things lined up. If you really want to ensure maximum precision, try exporting a stem of just the DPCM channel and compare it side-by-side with your original .wav sample (for example in Audacity), then made adjustments where necessary in the module.
Another tool at your disposal is the Yxx command, which is the "sample offset". A value of Y00 (default) makes samples play from the very start, but Y01 starts playback a little later, Y02 later still, and so on, all the way up to Y3F being the very end of the sample. Like other commands in FamiTracker, this one needs to be "reset" to 00 in order to return to playing samples from the beginning; for example after you use Y10, all samples will use that offset until you tell it otherwise.
STEP 5
A few extra notes about optimizing the sound!
Delta offset
The first thing is about the DPCM offset - the Zxx command that controls how loud the triangle+noise+DPCM are. DPCM samples naturally offset this away from 0, so if you want to maintain the loudest + most consistent volume of your DPCM, peppering in Z00 commands is the way to go. Z00 is the loudest possible setting (and the default, which will go unchanged until you use DPCM somewhere), while Z7F is the quietest.
These commands do make a slight popping/clicking noise, so you may want to put them on beat accents to mask their presence. You'll hear them if you solo the DPCM channel though. The bigger the shift in Zxx value, the louder the popping noise will be; you may want to interpolate a string of them in some situations to minimize this. Notably, Note Cuts (—) also naturally execute a Z00 command in the DPCM channel (by default - there's a FamiTracker setting to stop this, "Don't reset DPCM on note stop").
Chunks of silence
The second thing is that large chunks of silence might be worth cutting, since they create a natural high hissing noise. It's quiet, but probably worth removing. You could remove them from the samples themselves using RJDMC - this is actually more space-efficient and would shave off just a few kilobytes from your DPCM storage - or you could use the Yxx command (sample offset, as described in step 4) to offset the start point of the samples.
In the example below, there was a bunch of silence at the end of C#5 (not pictured) and the beginning of D-5. I cut C#5 when there was no tone anymore, and used the Yxx command to play only the last little bit of the D-5 sample, where there was sound again. Yxx goes from values 00-3F, with 3F being the very very end of the sample. This will also take trial and error to place, but again it might be worth it for the best sound quality.
Yxx also has to be reset. It'll keep applying to new notes otherwise. That's why I added Y00 before the next note D#5.

(example of how to track in split DPCM using Gxx, Yxx and Zxx)
Yet more cool applications of Yxx
One more useful thing that the Yxx sample offset command can help you with is inserting other samples in between your new big split DPCM behemoth. For example, maybe you really want your DPCM kick drum to slap in the middle of your cool solo, but it's right in the middle of one of your samples. Add the kick as normal, then "return" to the previous sample by inputting it again with some Yxx offset value. Determining the right value will take some trial and error but it most efficiently uses your one sample channel with minimal interruption!
This method has one advantage over the previous one: as it doesn't rely on .dmc files, it is compatible with a wider range of music making software (such as it2nsf).
Apart from that, it's mostly a matter of taste. You can try both and stick with the one you prefer.
STEP 1
Prepare your base sample
Choose the audio file that will be turned into split DPCM samples. Convert it to WAV if it's in another format.
It's not obligatory but strongly advised to modify it using Audacity or another audio editor to make it sound better once converted to DPCM. A good starting point is to auto-amplify the audio the most you can without clipping. It can be done with Audacity using: Effect -> Volume and Compression -> Amplify (then keep the default value).
For further information on preparing your audio, you can refer to the step 1 of the first method.
STEP 2
Split the base sample
You will split it into small WAV files that can be used directly by your music making tool (FamiTracker, it2nsf...).
A straightforward way to do so is to do all the work manually in Audacity... but this is quite long to do and very boring.
A more interesting solution is to use SoX (Sound eXchange), an audio processing tool available on Windows, macOS and Linux. Download it from here:
https://sourceforge.net/projects/sox/
Note
Setup for Windows users
Extract the SoX archive somewhere, let's suppose for this guide that you extracted it in your Music directory. Thus, in a path like 'C:\Users\user\Music\sox-14.4.2\', you should have an executable called sox and a bunch of other files.
Move your base sample in the 'sox-14.4.2' directory.
Launch the Windows Command Prompt, also called Cmd. You should see it by typing Cmd in the start menu.
Cmd behaves the same way as the file explorer in the sense that you can use it to browse your file system. Enter the command dir (type 'dir', then press return), it should show you the content of you home folder.
Enter 'cd Music\sox-14.4.2' to move your SoX directory. Enter dir again, if everything went well you will see the content of 'sox-14.4.2'.
Now you can use SoX from Cmd! Note that if you restart Cmd, then you will have to enter 'cd Music\sox-14.4.2' again.
Using SoX
Let's suppose here that your base sample is called piano.wav, try this command:
This will split piano.wav into 1s WAV files called piano_001, piano_002, piano_003, ... so that playing these files one after the other would reproduce piano.wav.
Note
You can change '1' to another value to modify the duration of the split samples. For instance if you use it2nsf, you will need them to be 0.5s long so you can type:
If you need another naming convention for your split samples, you can change 'piano_' in 'piano_.wav' by any valid string. For example, the following command will name the split samples vombot001, vombot002, vombot003...
STEP 3
Import the split samples in your music software
This part will only cover FamiTracker and it2nsf, feel free to add a section about any other software you are familiar with!
FamiTracker
Add a 2a03 instrument to your song, then import all the split samples from the DPCM editor. Then you just have to play each of them with regular steps and in the right order to reproduce the base sample in your song!
Note that as each sample (except maybe the last one) is exactly 1s long, you can do some maths to find the correct interval between each sample.
Example : let's suppose the engine speed of your song is set to NTSC and you are using speed 6
This example is convenient because the duration of the split samples is a whole number of rows. When it's not the case, you will have to use the effect Gxx (note delay) to obtain the desired number of ticks.
it2nsf
Import the samples in you .it module and make an .it instrument for each of them. Then you will have to update the MML code in the song comments with all your new DPCM instruments. You can use this kind of syntax (with correct instrument/sample numbers):
STEP 4
Listen and redo
Listen to your song, is it to your liking? If not, you can adjust the base sample and regenerate split samples pretty quickly with SoX.
See the step 5 of the first method to learn more about FamiTracker effects that are related to DPCM.
it2nsf specificity
A first thing to note is that DPCM samples will sound differently in it2nsf compared to FamiTracker. None is objectively better, if possible you can try both and choose the kind of sound you think will be more suited to you song.
Another important difference with FamiTracker is that it2nsf isn't limited to a total of 64 DPCM samples. Thus, a song made with it2nsf can contain a little more than 90s of sample audio while FamiTracker is limited to 64s (with 1s samples).
All related Lyceum articles:
referencing to:
- nsf (format)
- nsfplus (format)
- FamiTracker
- 0CC-FamiTracker
- Dn-FamiTracker
- it2nsf
- 2a03 (soundchip)
- NES Famicom (console)
Helper Tools
::|CONTENTS
This is a guide for playing long DPCM samples in your NES songs. DPCM have a restricted maximal length: a little over 1 second long each on FamiTracker, a little over 0.5 seconds on it2nsf... However it is possible to split a longer sample in small parts and play these in the right order.This page will introduce two different methods to achieve this.
Using RJDPCM
For this, you will need RJDMC (RushJet1's DMC tool). As of 5/9/25 the latest version is v1.55, which is available on GitHub here: link to RJDMC download. RushJet's thread about this program can be found here.
STEP 1
Use RJDMC.exe to handle turning the .wav into DPCM.

(the RJDMC interface)
Importing and Exporting
You can import a .wav either with the yellow folder icon on the left, or from the File menu. I'm pretty sure it has to be 16-bit or less, so if it gives you an error, try re-encoding the .wav as such, for example using Audacity.
If you were working with just a short sample, from here you could just save the .dmc (DPCM sample format) by clicking the 2nd floppy disk icon (the sideways one on the right), or from the File menu as well. In that case, if it's too long, the end of the sample will just be cut off. You can't save long samples this way.
For longer samples, you have to go to File -> "Save split .dmc". This pops up a new window for you to specify where to save to. Tell it where to save and what to name your file with the "..." button. The default "Individual Size" of 4000 bytes should be fine (reducing it makes each split sample smaller). The max is actually 4081 but it doesn't really matter. Yes, the file you're saving is a .txt. It's weird.
The maximum number of DPCM samples is 64, so if you are poised to exceed that amount, the tool will warn you. In practice this means you can fit a little over one minute of DPCM audio into an .nsf.

(the "Save split .dmc" dialog)
Editing the Audio
In addition to being able to "Preview" your sample (using the play buttons at the top right), you can do some simple audio editing within RJDMC, like creating fades, adjusting volume, or deleting segments of audio (useful for deleting tails). Even when dealing with regular-sized DPCM samples I generally use this instead of FamiTracker's sample import because it has a few more options. Right click in the waveform area to see these options. In my experience, Revert/Undo actually undoes all changes, not just one.
There are other advanced settings on the right to adjust pitch, sample quality, bitcrushing, and "tilt" which is like creating more (or maybe less) DC offset, impacting the so-called "delta offset" described later in Step 5. The default settings will generally give you the highest quality, but they can be fun to mess around with. You probably won't need them.
It's worth mentioning that volume is kind of finicky with DPCM. Because it's so compressed and hissy sounding, increasing the volume also introduces some extra distortion, changing the tone of the samples somewhat. However DPCM is also noisier at low volumes. Empty space creates a natural high hissing sound, and quiet samples (or quiet parts of samples) naturally contain more noise - or maybe even become just noise if they are quiet enough. This is why something like a ride cymbal sounds particularly weak in DPCM, since it's all attack and a bunch of very quiet, high frequency decay.
In my experience, it's best to process your .wav samples beforehand if your goal is to maximize volume or you really want your samples heard clearly. Compressing and normalizing audio to minimize dynamic range is likely to be worth it because the DPCM channel is altogether not very loud. Raising the gain level on the DPCM within RJDMC (or FamiTracker import) is an option too, but test this to see if you are still comfortable with how it sounds - a limiter-like distortion starts getting introduced the louder you go. Some testing may be necessary to get your ideal sound.

(get compressed, nerd! the bottom example was heavily compressed and was able to present more prominently in the mix)
STEP 2
Deal with your new "split DPCM" .txt file.
Get those samples!
This step is annoying and unintuitive. I apologize in advance.
Open a brand new FamiTracker module. Not your song, a blank module. Go to File -> "Import Text…". THIS WILL OVERWRITE THE ENTIRE CURRENTLY OPEN MODULE which is why it's important to not do this with your song. Avert tragedy.
Once imported, you will now have a module that contains 1 instrument. That instrument will have every .dmc sample file from your RJDMC conversion loaded up. They are in order from 0 to whatever - as in, 0.dmc is the beginning of your big sample, then 1.dmc, etc etc.
I bet you think it's as simple as just saving that new instrument and loading it up in your module, right? Well, it should be, but there's a bug or something. Don't even bother saving the instrument, because opening it up will give you an error: "DPCM sample index out of range..."
So what you have to do is save each .dmc one-by-one from out of the instrument. Click "0.dmc" and press Save to the right, then "1.dmc", and so on until you've saved every sample. It's tedious but I know of no other way to do this.
STEP 3
Import all the .dmc files into your module.
Load em up!
This step is easy enough. Load up an instrument in your module, go to the "DPCM samples" tab, click "Load" on the right, and select all your fresh new .dmc samples. This brings them into your module.
Assign them to whatever string of notes you want using the ← left arrow button. It'll automatically do a run of 12 samples if you just keep pressing ← after the first one, but for whatever reason after 12 you have to select a note (Key) and do that again.
STEP 4
Put everything in its right place.
Time to get precise
Now it's time to place all the samples into the tracker! Fun fun! There is an extent to which this is trial-and-error, but since every sample is the same length, once you've spaced a couple of the samples out correctly, the rest can be approximated pretty quickly.
Start out with getting 0.dmc in the right place by adding the appropriate note into your pattern, then add 1.dmc somewhere in the vicinity of where it should be. Listen carefully for blank space between the samples (this means you need to move 1.dmc earlier) or for if the second sample triggers too soon (so you need to move 1.dmc later). Soloing only the DPCM channel helps pinpoint this.
You will almost surely need to use the Gxx command, which delays notes by X ticks. Although fairly precise, it may not be 100% perfect but unfortunately there is no G½ so use your best judgment!
Once you know how much space is between the first two, it's pretty safe to assume that you can apply the same amount of space between all the other split samples. Because of it being somewhat imprecise, you may have to offset by one tick every now and then to keep things lined up. If you really want to ensure maximum precision, try exporting a stem of just the DPCM channel and compare it side-by-side with your original .wav sample (for example in Audacity), then made adjustments where necessary in the module.
Another tool at your disposal is the Yxx command, which is the "sample offset". A value of Y00 (default) makes samples play from the very start, but Y01 starts playback a little later, Y02 later still, and so on, all the way up to Y3F being the very end of the sample. Like other commands in FamiTracker, this one needs to be "reset" to 00 in order to return to playing samples from the beginning; for example after you use Y10, all samples will use that offset until you tell it otherwise.
STEP 5
A few extra notes about optimizing the sound!
Delta offset
The first thing is about the DPCM offset - the Zxx command that controls how loud the triangle+noise+DPCM are. DPCM samples naturally offset this away from 0, so if you want to maintain the loudest + most consistent volume of your DPCM, peppering in Z00 commands is the way to go. Z00 is the loudest possible setting (and the default, which will go unchanged until you use DPCM somewhere), while Z7F is the quietest.
These commands do make a slight popping/clicking noise, so you may want to put them on beat accents to mask their presence. You'll hear them if you solo the DPCM channel though. The bigger the shift in Zxx value, the louder the popping noise will be; you may want to interpolate a string of them in some situations to minimize this. Notably, Note Cuts (—) also naturally execute a Z00 command in the DPCM channel (by default - there's a FamiTracker setting to stop this, "Don't reset DPCM on note stop").
Chunks of silence
The second thing is that large chunks of silence might be worth cutting, since they create a natural high hissing noise. It's quiet, but probably worth removing. You could remove them from the samples themselves using RJDMC - this is actually more space-efficient and would shave off just a few kilobytes from your DPCM storage - or you could use the Yxx command (sample offset, as described in step 4) to offset the start point of the samples.
In the example below, there was a bunch of silence at the end of C#5 (not pictured) and the beginning of D-5. I cut C#5 when there was no tone anymore, and used the Yxx command to play only the last little bit of the D-5 sample, where there was sound again. Yxx goes from values 00-3F, with 3F being the very very end of the sample. This will also take trial and error to place, but again it might be worth it for the best sound quality.
Yxx also has to be reset. It'll keep applying to new notes otherwise. That's why I added Y00 before the next note D#5.

(example of how to track in split DPCM using Gxx, Yxx and Zxx)
Yet more cool applications of Yxx
One more useful thing that the Yxx sample offset command can help you with is inserting other samples in between your new big split DPCM behemoth. For example, maybe you really want your DPCM kick drum to slap in the middle of your cool solo, but it's right in the middle of one of your samples. Add the kick as normal, then "return" to the previous sample by inputting it again with some Yxx offset value. Determining the right value will take some trial and error but it most efficiently uses your one sample channel with minimal interruption!
Working with WAV files
This method has one advantage over the previous one: as it doesn't rely on .dmc files, it is compatible with a wider range of music making software (such as it2nsf).
Apart from that, it's mostly a matter of taste. You can try both and stick with the one you prefer.
STEP 1
Prepare your base sample
Choose the audio file that will be turned into split DPCM samples. Convert it to WAV if it's in another format.
It's not obligatory but strongly advised to modify it using Audacity or another audio editor to make it sound better once converted to DPCM. A good starting point is to auto-amplify the audio the most you can without clipping. It can be done with Audacity using: Effect -> Volume and Compression -> Amplify (then keep the default value).
For further information on preparing your audio, you can refer to the step 1 of the first method.
STEP 2
Split the base sample
You will split it into small WAV files that can be used directly by your music making tool (FamiTracker, it2nsf...).
A straightforward way to do so is to do all the work manually in Audacity... but this is quite long to do and very boring.
A more interesting solution is to use SoX (Sound eXchange), an audio processing tool available on Windows, macOS and Linux. Download it from here:
https://sourceforge.net/projects/sox/
Note
- On Linux, SoX may already be installed on your system.
- On Windows, unless you are already confident with command line programs, download the .zip file (eg sox-14.4.2-win32.zip), not the .exe version.
Setup for Windows users
Extract the SoX archive somewhere, let's suppose for this guide that you extracted it in your Music directory. Thus, in a path like 'C:\Users\user\Music\sox-14.4.2\', you should have an executable called sox and a bunch of other files.
Move your base sample in the 'sox-14.4.2' directory.
Launch the Windows Command Prompt, also called Cmd. You should see it by typing Cmd in the start menu.
Cmd behaves the same way as the file explorer in the sense that you can use it to browse your file system. Enter the command dir (type 'dir', then press return), it should show you the content of you home folder.
Enter 'cd Music\sox-14.4.2' to move your SoX directory. Enter dir again, if everything went well you will see the content of 'sox-14.4.2'.
Now you can use SoX from Cmd! Note that if you restart Cmd, then you will have to enter 'cd Music\sox-14.4.2' again.
Using SoX
Let's suppose here that your base sample is called piano.wav, try this command:
sox piano.wav piano_.wav trim 0 1 : newfile : restart
This will split piano.wav into 1s WAV files called piano_001, piano_002, piano_003, ... so that playing these files one after the other would reproduce piano.wav.
Note
- You have to use the exact same spacing as above or it won't work.
- The command still works if the duration of piano.wav is not a whole number of seconds, this will just make the last sample shorter than 1s.
- When using the command line, you can press the up arrow key to access to previously entered commands, so you don't have to retype/copy-paste this long command each time you use SoX!
You can change '1' to another value to modify the duration of the split samples. For instance if you use it2nsf, you will need them to be 0.5s long so you can type:
sox piano.wav piano_.wav trim 0 0.5 : newfile : restart
If you need another naming convention for your split samples, you can change 'piano_' in 'piano_.wav' by any valid string. For example, the following command will name the split samples vombot001, vombot002, vombot003...
sox piano.wav vombot.wav trim 0 1 : newfile : restart
STEP 3
Import the split samples in your music software
This part will only cover FamiTracker and it2nsf, feel free to add a section about any other software you are familiar with!
FamiTracker
Add a 2a03 instrument to your song, then import all the split samples from the DPCM editor. Then you just have to play each of them with regular steps and in the right order to reproduce the base sample in your song!
Note that as each sample (except maybe the last one) is exactly 1s long, you can do some maths to find the correct interval between each sample.
Example : let's suppose the engine speed of your song is set to NTSC and you are using speed 6
- As the engine speed is set to NTSC, the duration of each tick is 1/60s
- Then, the duration of each sample is 60 ticks
- As you're using speed 6, each row of the song contains 6 ticks
- As 60=6*10, the duration of each sample is 1s=60 ticks=10 rows
- Hence, you will have to insert a sample every 10 rows
This example is convenient because the duration of the split samples is a whole number of rows. When it's not the case, you will have to use the effect Gxx (note delay) to obtain the desired number of ticks.
it2nsf
Import the samples in you .it module and make an .it instrument for each of them. Then you will have to update the MML code in the song comments with all your new DPCM instruments. You can use this kind of syntax (with correct instrument/sample numbers):
instr dpcm 1


type DPCM


duty 15


sample 1


instr dpcm 2


type DPCM


duty 15


sample 2


instr dpcm 3


type DPCM


duty 15


sample 3


...
STEP 4
Listen and redo
Listen to your song, is it to your liking? If not, you can adjust the base sample and regenerate split samples pretty quickly with SoX.
See the step 5 of the first method to learn more about FamiTracker effects that are related to DPCM.
it2nsf specificity
A first thing to note is that DPCM samples will sound differently in it2nsf compared to FamiTracker. None is objectively better, if possible you can try both and choose the kind of sound you think will be more suited to you song.
Another important difference with FamiTracker is that it2nsf isn't limited to a total of 64 DPCM samples. Thus, a song made with it2nsf can contain a little more than 90s of sample audio while FamiTracker is limited to 64s (with 1s samples).
See also
All related Lyceum articles:
referencing to:
- nsf (format)
- nsfplus (format)
- FamiTracker
- 0CC-FamiTracker
- Dn-FamiTracker
- it2nsf
- 2a03 (soundchip)
- NES Famicom (console)
C A T E G O R I E S
Arps · BoobieSqueezer · BotBd · C700 VST · Complete list of ripped chiptunes repositories · CreepSmash_Hotkeys · Custom MT-32 Voice Guide · dmf2pmd.py · Droidsound-E · FMPMD2000 · foobar2000 · FTM2GBMC · GBA MML Music Player · GBAMusRiper · GBT Player · Guitar Pedals and YOU · hoot · How to change the UI font size in pxtone collab · HuSIC · I am new to ST YM trackers · I am new to Vortex Tracker · I'm New To ZXBeep · Intro to Subtractive Synthesis · IRC · IT Module Optimisation · it2nsf · it2vgm.py · j0CC-FamiTracker · Just Another Musicplayer · Krawall · List of DAWs · List of Trackers · Mariopants · Maxmod · MML · MOD2PSG2 · modshroom · munch.py · Namco 163 Tools · NSFPlay · PPMCK · Professional Music Driver · Remixbot · s3m2nsf · S98 Input · ShroomTool · Sleizsa · Sleizsa Duo · Sleizsa Trio · SNESMOD · Split DPCM Guide · Stocker · Tinymod Optimization Strategies · Tools · UnkrawerterGBA · Using .it Instruments · VCV Rack · VirtuaNSF · VST list · XPMCK · ZMUSIC
BotBrs online
cabbage drop haberchuck MattMoney microcosmic Ogladian th4 D34D Unconventional WobbleBlast
and 14 guests
and 14 guests